Monday, October 3, 2011

PopUpWindow in Android

Android supports Popup Window like in IPhone. The difference between pop up window and dialog is we have to set the position (like center, top, bottom...) and also x and y positions. The below snippets explains the way.
 Home.java:
package com.popup.activities;

import android.app.Activity;
import android.os.Bundle;
import android.view.Gravity;
import android.view.View;
import android.view.View.OnClickListener;
import android.view.ViewGroup.LayoutParams;
import android.widget.Button;
import android.widget.PopupWindow;

public class Home extends Activity
{
    private Button btnShowPopUp;
    private PopupWindow mpopup;
       
    @Override
    public void onCreate(Bundle savedInstanceState)
    {
        super.onCreate(savedInstanceState);
        setContentView(R.layout.main);
       
        btnShowPopUp = (Button)findViewById(R.id.btnShowPopUp);
       
        btnShowPopUp.setOnClickListener(new OnClickListener()
        {           
            @Override
            public void onClick(View arg0)
            {
                View popUpView = getLayoutInflater().inflate(R.layout.popup, null); // inflating popup layout
                mpopup = new PopupWindow(popUpView, LayoutParams.FILL_PARENT, LayoutParams.WRAP_CONTENT, true); //Creation of popup
                mpopup.setAnimationStyle(android.R.style.Animation_Dialog);  
                mpopup.showAtLocation(popUpView, Gravity.BOTTOM, 0, 0);    // Displaying popup
               
                Button btnOk = (Button)popUpView.findViewById(R.id.btnOk);
                btnOk.setOnClickListener(new OnClickListener()
                {                   
                    @Override
                    public void onClick(View v)
                    {
                        mpopup.dismiss();  //dismissing the popup
                    }
                });
               
                Button btnCancel = (Button)popUpView.findViewById(R.id.btnCancel);
                btnCancel.setOnClickListener(new OnClickListener()
                {                   
                    @Override
                    public void onClick(View v)
                    {
                        mpopup.dismiss(); dismissing the popup
                    }
                });
            }
        }); 
    }
}
main.xml:
<?xml version="1.0" encoding="utf-8"?>
<LinearLayout
    xmlns:android="http://schemas.android.com/apk/res/android"
    android:orientation="vertical"
    android:layout_width="fill_parent"
    android:layout_height="fill_parent">
  
    <Button
        android:layout_width="wrap_content"
        android:id="@+id/btnShowPopUp"
        android:text="ShowPopUp"
        android:layout_height="wrap_content">
    </Button>
  
</LinearLayout>
popup.xml:
<?xml version="1.0" encoding="utf-8"?>
<LinearLayout
  xmlns:android="http://schemas.android.com/apk/res/android"
  android:layout_width="fill_parent"
  android:orientation="vertical"
  android:background="#90FFFFFF"
  android:layout_height="wrap_content">
 
  <TextView
      android:layout_width="fill_parent"
      android:text="PopUp Window"
      android:textColor="#000000"
      android:gravity="center"
      android:textStyle="bold"
      android:layout_height="wrap_content">
  </TextView>
 
  <Button
      android:layout_width="fill_parent"
      android:id="@+id/btnOk"
      android:text="Ok"
      android:layout_height="wrap_content">
  </Button>
 
  <Button
      android:layout_width="fill_parent"
      android:id="@+id/btnCancel"
      android:text="Cancel"
      android:layout_height="wrap_content">
  </Button>
 
</LinearLayout>

Sunday, September 18, 2011

Showing Buttons on either side of a layout


<?xml version="1.0" encoding="utf-8"?>
<LinearLayout
    xmlns:android="http://schemas.android.com/apk/res/android"
    android:orientation="vertical"
    android:layout_width="fill_parent"
    android:background="#FFFFFF"
    android:layout_height="fill_parent">
   
    <!-- Header -->
    <RelativeLayout
        android:layout_width="fill_parent"
        android:background="@drawable/top_header"
        android:paddingLeft="5dip"
        android:paddingRight="5dip"
        android:layout_height="50dip">
       
        <Button
            android:layout_width="wrap_content"
            android:background="@drawable/back_btn"
            android:layout_centerVertical="true"
            android:layout_alignParentLeft="true"
            android:layout_height="wrap_content">
        </Button>
       
        <Button
            android:layout_width="wrap_content"
            android:background="@drawable/cancle_btn"
            android:layout_centerVertical="true"
            android:layout_alignParentRight="true"
            android:layout_height="wrap_content">
        </Button>
       
    </RelativeLayout>
   
    <!-- Body -->
     
</LinearLayout>

Friday, September 16, 2011

Three Level Expandable list

The below snippet helps to implement three level list in android.
First Group
--Sub Group
   ---   Child1
   ---   Child 2
   ---   Child 3
in this pattern.....
main.xml:
<?xml version="1.0" encoding="utf-8"?>
<LinearLayout xmlns:android="http://schemas.android.com/apk/res/android"
    android:orientation="vertical"
    android:layout_width="fill_parent"
    android:layout_height="fill_parent">
 
    <ExpandableListView
    android:layout_width="fill_parent"
    android:id="@+id/ParentLevel"
    android:groupIndicator="@null"
    android:layout_height="fill_parent">
    </ExpandableListView>

</LinearLayout>

Home.java
package com.threeelevellist.activities;

import android.app.Activity;
import android.content.Context;
import android.graphics.Color;
import android.os.Bundle;
import android.view.View;
import android.view.ViewGroup;
import android.widget.BaseExpandableListAdapter;
import android.widget.ExpandableListView;
import android.widget.ListView;
import android.widget.TextView;
import android.widget.LinearLayout.LayoutParams;

public class Home extends Activity 
{
    ExpandableListView explvlist;
    @Override
    public void onCreate(Bundle savedInstanceState) 
    {
        super.onCreate(savedInstanceState);
        setContentView(R.layout.main);
        
        explvlist = (ExpandableListView)findViewById(R.id.ParentLevel);
        explvlist.setAdapter(new ParentLevel());
        
    }
    
    public class ParentLevel extends BaseExpandableListAdapter
    {

@Override
public Object getChild(int arg0, int arg1) 
{
return arg1;
}

@Override
public long getChildId(int groupPosition, int childPosition) 
{
return childPosition;
}

@Override
public View getChildView(int groupPosition, int childPosition,
boolean isLastChild, View convertView, ViewGroup parent) 
{
CustExpListview SecondLevelexplv = new CustExpListview(Home.this);
SecondLevelexplv.setAdapter(new SecondLevelAdapter());
SecondLevelexplv.setGroupIndicator(null);
return SecondLevelexplv;
}

@Override
public int getChildrenCount(int groupPosition) 
{
return 3;
}

@Override
public Object getGroup(int groupPosition) 
{
return groupPosition;
}

@Override
public int getGroupCount() 
{
return 5;
}

@Override
public long getGroupId(int groupPosition) 
{
return groupPosition;
}

@Override
public View getGroupView(int groupPosition, boolean isExpanded,
View convertView, ViewGroup parent) 
{
TextView tv = new TextView(Home.this);
tv.setText("->FirstLevel");
tv.setBackgroundColor(Color.BLUE);
tv.setPadding(10, 7, 7, 7);
return tv;
}

@Override
public boolean hasStableIds() 
{
return true;
}

@Override
public boolean isChildSelectable(int groupPosition, int childPosition) 
{
return true;
}    
    }
    
    public class CustExpListview extends ExpandableListView
    {
int intGroupPosition, intChildPosition, intGroupid;
public CustExpListview(Context context) 
{
super(context);
}
protected void onMeasure(int widthMeasureSpec, int heightMeasureSpec) 
{
widthMeasureSpec = MeasureSpec.makeMeasureSpec(960, MeasureSpec.AT_MOST);
heightMeasureSpec = MeasureSpec.makeMeasureSpec(600, MeasureSpec.AT_MOST);
super.onMeasure(widthMeasureSpec, heightMeasureSpec);
}
    }
    
    public class SecondLevelAdapter extends BaseExpandableListAdapter
    {

@Override
public Object getChild(int groupPosition, int childPosition) 
{
return childPosition;
}

@Override
public long getChildId(int groupPosition, int childPosition) 
{
return childPosition;
}

@Override
public View getChildView(int groupPosition, int childPosition,
boolean isLastChild, View convertView, ViewGroup parent) 
{
TextView tv = new TextView(Home.this);
tv.setText("child");
tv.setPadding(15, 5, 5, 5);
tv.setBackgroundColor(Color.YELLOW);
tv.setLayoutParams(new ListView.LayoutParams(LayoutParams.FILL_PARENT, LayoutParams.FILL_PARENT));
return tv;
}

@Override
public int getChildrenCount(int groupPosition) 
{
return 5;
}

@Override
public Object getGroup(int groupPosition) 
{
return groupPosition;
}

@Override
public int getGroupCount() 
{
return 1;
}

@Override
public long getGroupId(int groupPosition) 
{
return groupPosition;
}

@Override
public View getGroupView(int groupPosition, boolean isExpanded,
View convertView, ViewGroup parent) 
{
TextView tv = new TextView(Home.this);
tv.setText("-->Second Level");
tv.setPadding(12, 7, 7, 7);
tv.setBackgroundColor(Color.RED);
return tv;
}

@Override
public boolean hasStableIds() {
// TODO Auto-generated method stub
return true;
}

@Override
public boolean isChildSelectable(int groupPosition, int childPosition) {
// TODO Auto-generated method stub
return true;
}
   
    }
}

Route Map in Android

The following snippet shows the route between two Geo points in google map using default maps application.

Uri uri = Uri.parse("http://maps.google.com/maps?&saddr=slat,slon&daddr=dlat,dlon");

Here saddr -> source address
        daddr -> destination address
        slat    -> source latitude
        slon   -> source longitude
        dlat   -> destination latitude
        dlon  -> destination longitude

 Intent intent = new Intent(Intent.ACTION_VIEW, uri);
 startActivity(intent);
       

Thursday, September 8, 2011

InputStream to String

public String convertBrToString(InputStream in)
{
       
        BufferedReader br;
       
        StringBuffer outString = new StringBuffer();
       
        br = new BufferedReader(new InputStreamReader(in));
       
        String read = br.readLine();
       
        while(read != null)
        {
            outString.append(read);
            read =br.readLine();
        }
       
        return outString.toString();     
}

Thursday, August 25, 2011

Converting Pixel To Dip

The below snippet converts pixel to dip(Device Independent Pixel) . We have to pass pixel value as an argument then it returns dip value for that.

public int getDip(int pixel)
{
        float scale = getBaseContext().getResources().getDisplayMetrics().density;
        return (int) (pixel * scale + 0.5f);
 }

Wednesday, August 24, 2011

Maps on Android

      This Tutorial helps to intigrate google maps to Application. Default android package did not provide google maps library. So we have to add exteranlly or it can be downloadable with android sdk it self.

Step 1: (If you already did this then ignore this step)
Adding Google Maps library to Android SDK :
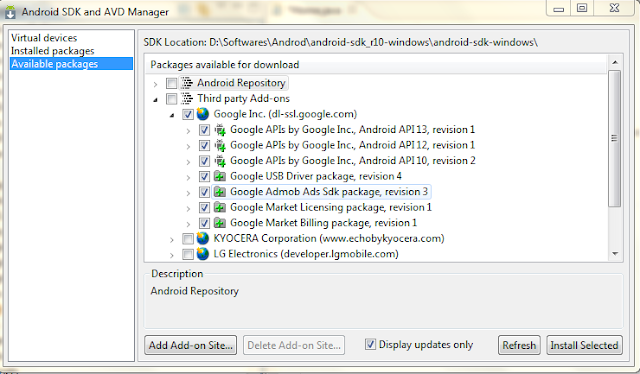
In Eclipse : Window -> Android Sdk and AVD Manager
Then the following window will appear.
In that window Select Available Packages
Click On Third Party Add-ons. Then you will find a list like below.

In that select Google Inc. In that select Google Api with the versions that you want and click on Install selected. Then It will install.
Step 2:
In order to display google maps in you app you have to genarate a MAPKEY .
Obtaining Map Key:
Generating MD5 FingerPrint for your system:
  • First we have to find default keystore existing in the system.
  • Go to C: ->  users -> Your User Name -> .android
  • There you find debug.keystore. Copy that keystore by creating a folder in c drive namely keystore.
  • Open Command Prompt and follow the image.


Then you get MD5 Finger print.

Registering Finger Print certificate with the Google Maps service:
Then you will get Map Key.

Step 3:
Adding Map Key to Application
If you want add maps in xml do like this

<com.google.android.maps.MapView
 android:layout_width="fill_parent"
 android:layout_height="fill_parent"
 android:enabled="true"
 android:clickable="true"
 android:apiKey="ApiKey"/>

Through coding then do like this
mMapView = new MapView(this, "ApiKey");

Step 4:
Change the Manifast.xml
<application
        android:icon="@drawable/icon"
        android:label="@string/app_name">
       < uses-library android:name="com.google.android.maps" />
      <activity
           .................
      </activity>
</application>

For detail information about google maps go to http://code.google.com/android/add-ons/google-apis/mapkey.html

Step 5:

Displying Google Map
manifast.xml:
<?xml version="1.0" encoding="utf-8"?>
<manifest
    xmlns:android="http://schemas.android.com/apk/res/android"
    package="com.googlmaps.activities"
    android:versionCode="1"
    android:versionName="1.0">

    <application
        android:icon="@drawable/icon"
        android:label="@string/app_name">
       
        <uses-library android:name="com.google.android.maps" />       
       
        <activity
            android:name=".Home"
            android:label="@string/app_name">
            <intent-filter>
                <action android:name="android.intent.action.MAIN"/>
                <category                        android:name="android.intent.category.LAUNCHER" />
            </intent-filter>
        </activity>
               
    </application>
    <uses-permission android:name="android.permission.INTERNET"></uses-permission>
</manifest>
main.xml:

<?xml version="1.0" encoding="utf-8"?>
<com.google.android.maps.MapView
    xmlns:android="http://schemas.android.com/apk/res/android"
    android:id="@+id/MapView"
    android:layout_width="fill_parent"
    android:layout_height="fill_parent"
    android:clickable="true"
    android:apiKey="0QpCkU-U_D--eTiGs8j5jCQ8LnJpyBgyoo7ilqQ"/>

Home.java:
package com.googlmaps.activities;
import android.os.Bundle;
import com.google.android.maps.MapActivity;
import com.google.android.maps.MapView;

public class Home extends MapActivity
{  
    private MapView mapView;
    @Override   
    public void onCreate(Bundle savedInstanceState)
    {
        super.onCreate(savedInstanceState);
        setContentView(R.layout.main);
       
        //Getting Id's
        mapView = (MapView)findViewById(R.id.MapView);
       
        //Getting Zoom Buttons
        mapView.setBuiltInZoomControls(true);
    }

    @Override
    protected boolean isRouteDisplayed()
    {
        return false;
    }
}

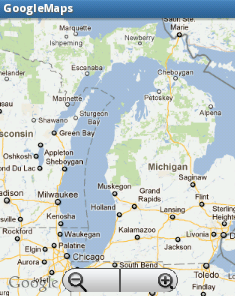
Output:
Step 6:
Adding Overlay Items
In order to add overlays on the map, create another class with the name as MapOverlays with the following options.
While creation mention super class as "com.google.android.maps.ItemizedOverlay"
MapOverlay.java:
package com.googlmaps.activities;
import java.util.ArrayList;
import android.content.Context;
import android.graphics.drawable.Drawable;
import com.google.android.maps.ItemizedOverlay;
import com.google.android.maps.OverlayItem;

@SuppressWarnings("rawtypes")
public class MapOverlays extends ItemizedOverlay
{
    private ArrayList<OverlayItem> mOverlays = new ArrayList<OverlayItem>();
   
    public MapOverlays(Drawable defaultMarker, Context context)
    {
        super(boundCenterBottom(defaultMarker));
    }

    @Override
    protected OverlayItem createItem(int arg0)
    {
        return mOverlays.get(arg0);
    }

    @Override
    public int size()
    {
        return mOverlays.size();
    }
   
    public void addOverlay(OverlayItem overlay)
    {
        mOverlays.add(overlay);
        populate();
    }
}

For the Home.java add these steps:

List<Overlay> mapOverlays;
Drawable drawable;
MapOverlays itemizedoverlay;
MapController mc;

//Creating Overlay Items
mapOverlays = mapView.getOverlays();
//Overlay marker
drawable = this.getResources().getDrawable(R.drawable.icon);
itemizedoverlay = new MapOverlays(drawable, Home.this);      

//Creation of Geo Point
GeoPoint point = new GeoPoint(19240000,-99120000);
OverlayItem overlayitem = new OverlayItem(point, "", "");
       
mc.setZoom(10);
mc.animateTo(point);
       
itemizedoverlay.addOverlay(overlayitem);
mapOverlays.add(itemizedoverlay);

Output:

Monday, August 22, 2011

Multiple Choice List Android

In Android List View provides an Option to allow Multiple selection of items. The following example shows the way to achieve this.
Example:


package com.lvcheck.activities;
import java.util.ArrayList;
import java.util.Collections;
import android.app.Activity;
import android.os.Bundle;
import android.view.View;
import android.view.View.OnClickListener;
import android.widget.AdapterView;
import android.widget.AdapterView.OnItemClickListener;
import android.widget.ArrayAdapter;
import android.widget.Button;
import android.widget.ListView;
import android.widget.Toast;

public class Home extends Activity
{
    private ListView lvCheckBox;
    private Button btnCheckAll, btnClearALl;
    private String[] arr = {"One", "Two", "Three", "Four", "Five", "Six"};
    ArrayList arrList;
       
     @Override
    public void onCreate(Bundle savedInstanceState)
    {
        super.onCreate(savedInstanceState);
        setContentView(R.layout.main);
       
        arrList = new ArrayList();
       
        btnCheckAll = (Button)findViewById(R.id.btnCheckAll);
        btnClearALl = (Button)findViewById(R.id.btnClearAll);
       
        lvCheckBox = (ListView)findViewById(R.id.lvCheckBox);
        lvCheckBox.setChoiceMode(ListView.CHOICE_MODE_MULTIPLE);
        lvCheckBox.setAdapter(new ArrayAdapter(this,
                android.R.layout.simple_list_item_multiple_choice, arr));
       
        lvCheckBox.setOnItemClickListener(new OnItemClickListener()
        {
            @Override
            public void onItemClick(AdapterView arg0, View arg1, int arg2, long arg3)
            {
                if(arrList.contains(arg2))
                {
                    arrList.remove((Integer)arg2);
                }
                else
                {
                    arrList.add(arg2);
                }
               
                Collections.sort(arrList);
                String strText = "";
               
                for(int i=0 ; i
arrList.size(); i++)                   
                       strText += arrList.get(i) + ",";
               
               
                Toast.makeText(Home.this, "Item Clicked: "+ strText, Toast.LENGTH_SHORT).show();               
            }
           
        });
       
        btnCheckAll.setOnClickListener(new OnClickListener()
        {           
            @Override
            public void onClick(View arg0)
            {
                arrList.clear();
                               

                for(int i=0 ; i < lvCheckBox.getAdapter().getCount(); i++)
                {
                    lvCheckBox.setItemChecked(i, true);
                    arrList.add(i);
                }
               
                String strText = "";
              
for(int i=0 ; i<arrList.size(); i++)   
                     strText += arrList.get(i) + ","
                Toast.makeText(Home.this, "Item Clicked: "+ strText, Toast.LENGTH_SHORT).show();
            }
        });
       
        btnClearALl.setOnClickListener(new OnClickListener()
        {           
            @Override
            public void onClick(View v)
            {
                arrList.clear();
                for(int i=0 ; i < lvCheckBox.getAdapter().getCount(); i++)
                {
                    lvCheckBox.setItemChecked(i, false);
                }
               
                String strText = "";
              for(int i=0 ; i<arrList.size(); i++)

                  strText += arrList.get(i) + ",";
               
                Toast.makeText(Home.this, "Item Clicked: "+ strText, Toast.LENGTH_SHORT).show();
            }
        });
    }    
}


Click Here To Download Complete Source

Tuesday, August 16, 2011

How To Move Applications to SDCARD in Android

From Android 2.2 Froyo onwards we can allow the application has to be installed on the external storage(SDCARD)

This feature is enabled by using this tag android:installLocation. By declaring this permission in the android manifast file.

If we do not declare this attribute, the application will be installed on the internal storage only and it cannot be moved to the external storage.

To allow the system to install your application on the external storage, modify the manifest file to include the android:installLocation attribute in the <manifest> element, with a value of either "preferExternal" or "auto". For example:

<manifest xmlns:android="http://schemas.android.com/apk/res/android"
    android:installLocation="preferExternal" or android:installLocation="auto"
    ... >


preferExternal : The App installs on the sdcard.

auto : There is no preference. The system will decide where to install based on several Factors.

However,  if your application is designed to support an API Level lower than 8, you can choose to support this feature for devices with API Level 8 or greater and still be compatible with devices using an API Level lower than 8.

To allow installation on external storage and remain compatible with versions lower than API Level 8:
  • Include the android:installLocation attribute with a value of "auto" or   "preferExternal" in the <manifest> element.
  • Leave your android:minSdkVersion attribute as is (something less than "8") and be certain that your application code uses only APIs compatible with that.
  • In order to compile your application, change your build target to API Level 8 (In default.properties). This is necessary because older Android libraries don't understand the android:installLocation attribute and will not compile your application when it's present.

Note: For More Information http://developer.android.com/guide/appendix/install-location.html

Wednesday, August 10, 2011

Youtube Preview Problem on android webview

Today i met with one problem. Actually i am getting the html data from the server. I am showing that using an webview. The problem is html data contain iframe tags. What it mean you tube videos. But at that position i am getting a black screen with you tube logo at bottom. But for iphone and Black berry directly loading preview.

      So that i tried to find the reason. I read no of forms. But there is no solution. On searching i found on e app with you tube videos. So Problem solved. They are taking the 1st frame of the you tube video and embed that using img tag and if we click on that image then redirect to the player.

      So i also search for getting 1st frame of an webview. The way is like this
                       http://img.youtube.com/vi/VIDEO_ID/#.jpg
Here VIDEO_ID : means every youtube vedio has one id.
                        #  :  0 - default size, 1- fisrst frame thumbnail , 2- second frame thumbnail,  3.....

So what you have to do is in the place of iframe tag did this type modification. Then problem will solved.

For More Details : http://www.reelseo.com/youtube-thumbnail-image/

Wednesday, July 27, 2011

opening a Dial-er Screen Android

In order open a Dial-er screen with the mobile no also android provides an intent.

Using this we will go to Dial-er screen.

In order use the intent we have to include a permission in the manifast.xml
<uses-permission android:name = "android.permission.CALL_PHONE"/>

Example:

Intent intent_Call = new Intent(Intent.ACTION_DIAL);
intent_Call.setData(Uri.parse("tel:" + strMobNo)); //strMobNo is the mobile no that we have to pass
startActivity(intent_Call);                                       //like 0123456789

how to make call in Android

Android provides default intent to manage calling.

Using this we directly go to calling screen.


In order use the intent we have to include a permission in the manifast.xml
<uses-permission android:name = "android.permission.CALL_PHONE"/>

Example:

Intent intent_Call = new Intent(Intent.ACTION_CALL);
intent_Call.setData(Uri.parse("tel:" + strMobNo)); //strMobNo is the mobile no that we have to pass
startActivity(intent_Call);                                       //like 0123456789

how to send an email

The snippet helps to send email from your android mobile.

Using this intent it will list a list of mail clients that are available to handle this intent.

If we select one of them then it will send email using that mail client.

Example.
 Intent emailIntent = new Intent(Intent.ACTION_SEND);
//Message Type
emailIntent.setType("text/image");

//To Address. Here strArrTo is an string array
emailIntent.putExtra(android.content.Intent.EXTRA_EMAIL, strArrTO);

//CC . Here strArrCC is an string array
emailIntent.putExtra(android.content.Intent.EXTRA_CC, strArrCC);

//BCC. Here strArrBCC is an string array
emailIntent.putExtra(android.content.Intent.EXTRA_BCC, strArrBCC);

//Subject line. Here strSUB is string
emailIntent.putExtra(android.content.Intent.EXTRA_SUBJECT, strSUB);

//Body..Here strMes is string
emailIntent.putExtra(android.content.Intent.EXTRA_TEXT, strMes);

//Starting Intent...
startActivity(emailIntent);

Friday, July 15, 2011

Context Menu Android

Context Menu is similar to right click on your desktop system.

In Android context menu is used with list view. In we long press list view item then the menu event fires.

In order to use Context Menu with the list view we have register the Context Menu for the list view. The following snippet explain the use of Context Menu with the list view.

Example:

main.xml
 <?xml version="1.0" encoding="utf-8"?>
<LinearLayout xmlns:android="http://schemas.android.com/apk/res/android"
    android:orientation="vertical"
    android:layout_width="fill_parent"
    android:layout_height="fill_parent">
  
    <ListView
        android:layout_width="fill_parent"
        android:id="@+id/lvContextMenu"
        android:layout_height="fill_parent">
    </ListView>   
       
</LinearLayout>

Home.java
package com.lvcm.activities;
import android.app.Activity;
import android.os.Bundle;
import android.view.ContextMenu;
import android.view.ContextMenu.ContextMenuInfo;
import android.view.Menu;
import android.view.MenuItem;
import android.view.View;
import android.view.ViewGroup;
import android.widget.AdapterView;
import android.widget.BaseAdapter;
import android.widget.ListView;
import android.widget.TextView;
import android.widget.Toast;

public class Home extends Activity
{
    ListView lvContextMenu;
    ListAdapter adapter;
    private String[] MenuItems = {"Edit", "Delete"};
   
    /** Called when the activity is first created. */
    @Override
    public void onCreate(Bundle savedInstanceState)
    {
        super.onCreate(savedInstanceState);
        setContentView(R.layout.main);
       
        //Getting the List View from the xml file
        lvContextMenu = (ListView)findViewById(R.id.lvContextMenu);
        lvContextMenu.setAdapter(new ListAdapter());
       
        //Registering Context Menu
        registerForContextMenu(lvContextMenu);
    }
   
    // Context Menu Creation
    @Override
    public void onCreateContextMenu(ContextMenu menu, View v, ContextMenuInfo menuInfo)
    {
        if (v.getId()==R.id.lvContextMenu)
        {           
            menu.setHeaderTitle("CONTEXT MENU");
            for (int i = 0; i< MenuItems.length; i++)
            {
                menu.add(Menu.NONE, i, i, MenuItems[i]);
            }
      }
    }
   
   // Context Menu Item Selection
    @Override
    public boolean onContextItemSelected(MenuItem item)
    {
        AdapterView.AdapterContextMenuInfo info =                                                                            (AdapterView.AdapterContextMenuInfo)item.getMenuInfo();
      
        // Getting the Id
        int menuItemIndex = item.getItemId();
        Toast.makeText(Home.this, "Clicked Item Position :"+info.position+"\n"+"Seleted Option Id :"+menuItemIndex, Toast.LENGTH_SHORT).show();       
        return true;
    }
     
    //List Adapter
    public class ListAdapter extends BaseAdapter
    {
        @Override
        public int getCount()
        {           
            return 10;
        }

        @Override
        public Object getItem(int arg0)
        {           
            return arg0;
        }

        @Override
        public long getItemId(int arg0)
        {           
            return arg0;
        }

        @Override
        public View getView(int arg0, View arg1, ViewGroup arg2)
        {
            TextView tv;
           
            if(arg1 == null)
            {
                tv = new TextView(Home.this);
            }
            else
            {
                tv = (TextView) arg1;
            }           
            tv.setText("list item");
            return tv;
        }       
    }
}
OutPut:

Thursday, July 14, 2011

Fonts Android / Custom Fonts

In android by default the following fonts are available.
DEFAULT
DEFAUT_BOLD
SERIF
SANS-SERIF
MONO SPACE

The Typeface class is used to specify the style of a font. In this example i am creating a textview and apply the fonts to that textview.

TextView tv = new TextView(this);

//For DEFAULT
tv.setTypeface(Typeface.DEFAULT);

//For DEFAUT_BOLD
tv.setTypeface(Typeface.DEFAULT_BOLD);

//For SERIF
tv.setTypeface(Typeface.SERIF);

//For SANS-SERIF
tv.setTypeface(Typeface.SANS_SERIF);  
//For MONO SPACE
tv.setTypeface(Typeface.MONOSPACE);

//Custom Fonts
To create custom font first we have to download the font file (.ttf). Copy that file to Assest folder of your project.

//Creation of custom font
Typeface tf = Typeface.createFromAsset(getAssets(), "BaroqueScript.ttf");
tv.setTypeface(tf);

Note:
For more info about Typeface visit
http://developer.android.com/reference/android/graphics/Typeface.html

Expandable list view move group icon indicator to right

The setIndicatorBounds(int left, int right) is used to set the indicator bounds for the group view of an expandable list view.

explvList.setIndicatorBounds(width-GetDipsFromPixel(35), width-GetDipsFromPixel(5));

Here width means device width.


//Convert pixel to dip
public int GetDipsFromPixel(float pixels)
{
        // Get the screen's density scale
        final float scale = getResources().getDisplayMetrics().density;
        // Convert the dps to pixels, based on density scale
        return (int) (pixels * scale + 0.5f);

}

Note:

The imp point is indicator icon design.

The icon should be like this height of the icon is equal to parent view height with transparent background. In that we put our required image in the center.

The width is equal to width specified in the setBounds method. Here in my snippet it is 35.

Other wise the icon is disturbed.

Output :

Tuesday, July 12, 2011

Reducing dimness while running Progress Dialog in Android

In Android while running progress dialog the screen become dim. The following snippet helpful to reduce the dimness.
 pdlg = ProgressDialog.show(getParent(), "Loading...", "");
WindowManager.LayoutParams lp = pdlg.getWindow().getAttributes();
 lp.dimAmount=0.0f;        //Dim Amount
 //Applying properties to progress dialog
 pdlg.getWindow().setAttributes(lp);
//Dismiss the dialog
pdlg.dismiss();
 

Wednesday, June 29, 2011

Checking SD card Existance

The below method returns true if the sd card is present on the mobile else it returns false.
public static boolean isSdPresent()
{                
      return android.os.Environment.getExternalStorageState().equals(android.os.Environment.MEDIA_MOUNTED);        }

How to install Android Apps

In order to install android application on your device there are 2 Ways.
-> Directly from Android Market Place
-> Manually if We have .apk file
Directly form Android Market Place:
Go to below link (Link to Android Market place). There you find lot of categorized  applications. From that you will directly found install option.
https://market.android.com/
Manually if we have apk file:
-> Copy the apk file into SDCARD
->Install third party applications like Astro File Manager, Application Installer if you mobile do not contain any default Application Installer.
https://market.android.com/details?id=com.metago.astro&feature=search_result  (Link to Astro File Manager)
->After installing the app open the app.
->It list all the apps in the sdcard.
->Click on the that u want to install.
->There you found install button.
That's it.

what is the Android

 Android is an operation system for the mobile devices. Android SDK (Software Development Kit) provides tools and API's to develop applications on the Android Platform.
Android Applications are developed using Java Programing language.
Features:
Good Development Environment
Application Frame Work
Dalvik Virtual Machine
Graphics
Gps (Globel Positioning System)
Media Support
GSM (Global System For Mobile)
Blue Tooth
Camera
Edge, Wi-Fi, 3G (Dependent On Hardware)
Integrated Browser
Note:
If you want more details about the content visit
http://developer.android.com/guide/basics/what-is-android.html

Tuesday, June 28, 2011

Preventing Screen to Lock while Application is running in Android / Hiding Screen Lock while app running

To prevent lock while running the application can be done two ways.
->PowerManager
->WindowManager
Using Power Manager is not a good way. They easily drain battery. So using Window Manager we can avoid the screen locking while application is running. Add the below snippet in your activity to avoid screen lock :
getWindow().addFlags(WindowManager.LayoutParams.FLAG_KEEP_SCREEN_ON);

No permissions required. Put the above code in the activity.

Thursday, June 16, 2011

Get Current Location in Android / Obtaining User Location

In Android Three Approaches are preferred to Get Current Location -> Using GPS -> Cell - Id -> Wi-Fi The above three gives a clue to get the current location. Gps gives the results accurately. But it consumes Battery. Android Network Location Provider get the current location based wifi signals and cell tower. We have to use both  or a single to Get the Current Location
LocationManager myManager;
MyLocListener loc;
loc = new MyLocListener();
myManager = (LocationManager) context.getSystemService(Context.LOCATION_SERVICE);
myManager.requestLocationUpdates(LocationManager.GPS_PROVIDER, 0, 0, loc );
package com.gps.activities;
import android.location.Location;
import android.location.LocationListener;
import android.os.Bundle;
public class MyLocListener implements LocationListener
{
    //Here you will get the latitude and longitude of a current location.
    @Override
    public void onLocationChanged(Location location)
    {
            if(location != null)
            {
                     Log.e("Latitude :", ""+location.getLatitude());
                     Log.e("Latitude :", ""+location.getLongitude());
            }
    }
    @Override
    public void onProviderDisabled(String provider) {
        // TODO Auto-generated method stub
       
    }
    @Override
    public void onProviderEnabled(String provider) {
        // TODO Auto-generated method stub
       
    }
    @Override
    public void onStatusChanged(String provider, int status, Bundle extras) {
        // TODO Auto-generated method stub
       
    }
}
Note: 
 Include the below permissions in manifast.xml to listen Location Updates.

<uses-permission       android:name="android.permission.ACCESS_FINE_LOCATION" />
<uses-permission     android:name="android.permission.ACCESS_COARSE_LOCATION"/>
Note : If you want more details about Obtaining User Location/ Get User Location refer the below link. http://developer.android.com/guide/topics/location/obtaining-user-location.html

Tuesday, June 14, 2011

Shared Preferences Persistent Storage in Android

In android we have more ways to store persistent data. Shared Preferences is one of the way to store primitive private data.
    Shared Preferences store data in the form of key value pairs. Using shared preferences we can store string, booleans, float, int, long etc.
    Shared Preferences store data until app uninstallation. 

Example:
 //Reading values from the Preferences
SharedPreferences prefs = getSharedPreferences("Pref_Name", MODE_WORLD_READABLE);
int StoredDealNumber =  prefs.getInt("Key", 0);

In order modify data in preferences we have to use Editor.
//Modification of the Preferences
SharedPreferences prefs = getSharedPreferences("Pref_Name", MODE_WORLD_WRITEABLE);
SharedPreferences.Editor     Prefeditor = prefs.edit();
Prefeditor .putInt("no", 1); // value to store
Prefeditor .commit();

Note:
After modification we have commit the values. Otherwise the values are not modified.

Monday, June 13, 2011

Publising the android application to market place

Signing is the final step of the development of an application. In order to submit any application to the android market place you have to sign the application.Signing can be done in two ways. Manually and with the help of editor(eclipse). With the help of editor it is very easy to sign an application.
Using Eclipse:

-> Right click on the project
-> In the Menu select Android Tools
-> Select Export Signed Application package. The following menu appears.
   Date Slider is the name of the project. Click on Next.
    If you have any keystore then select existing keystore. Otherwise select the other option and fill the appropriate details. Click on the next.
Minimum validity is 10000 days but 25 years Recommended. Fill the other details. Click the Next.
Browse the destination file path And click on Finish.

Note :
-> Before signing the application check the manifast file for the android:debuggable if it exist then   remove the this tag.
-> Versioning the  application properly.
-> Test the application completely.

If You want complete information then refer the following link
http://developer.android.com/guide/publishing/app-signing.html

Friday, June 10, 2011

Handling Orientation Change in Android

If you want perform some operation in the orientation the following snippet useful. If you change the orientation then one default method will call i.e onConfigurationChanged()

@Override
 public void onConfigurationChanged(Configuration newConfig)
{
         super.onConfigurationChanged(newConfig);
         if(newConfig.orientation == Configuration.ORIENTATION_LANDSCAPE)
         {           
                  // indicates orientation changed to landscape
         }             
         else if(newConfig.orientation == Configuration.ORIENTATION_PORTRAIT)
         {           
                  // indicates orientation changed to portrait
         }            
}

Note :
We will change the declaration of the Activity in manifast.xml to the following :
<activity android:name=".YourActivity" android:label="@string/app_name" android:configChanges="orientation|keyboardHidden" />

If you want know more information about this plz follow the link :
http://developer.android.com/guide/topics/resources/runtime-changes.html#HandlingTheChange   

getting current screen orientation in android

The following snippet gives the current screen orientation.

public int getScreenOrientation()
{
        return getResources().getConfiguration().orientation;
}

The above method return integer. We will compare as follows.

 if(getScreenOrientation() == Configuration.ORIENTATION_PORTRAIT)
 {
            //App is in Portrait mode
 }
 else
{
           //App is in LandScape mode
}


Thursday, May 19, 2011

Android Expandable ListView

A view that shows items in a vertically scrolling two-level list. This differs from the ListView by allowing two levels: groups which can individually be expanded to show its children. The items come from the ExpandableListAdapter associated with this view.

Steps to develop Expandable List :
-> Initialize the Expandable List View
-> Construct the Expandable List Adapter
-> Set the Adapter to Expandable List View


Initialize the Expandable List View
 ExpandableListView explvList;
 explvList = (ExpandableListView)findViewById(R.id.explvList);
Construct the Expandable List Adapter 
    public class ExpLvAdapter extends BaseExpandableListAdapter
    {
        @Override
        public Object getChild(int groupPosition, int childPosition)
        {           
            return childPosition;
        }

        @Override
        public long getChildId(int groupPosition, int childPosition)
        {
           
            return childPosition;
        }

        @Override
        public View getChildView(int groupPosition, int childPosition, boolean isLastChild, View convertView, ViewGroup parent)
        {
            TextView tv = null;
            tv = new TextView(Home.this);
            tv.setText("ChildView "+groupPosition);           
            tv.setPadding(30, 0, 0, 0);
            return tv;
        }
        @Override
        public int getChildrenCount(int groupPosition)
        {   
            return children[groupPosition].length;
        }

        @Override
        public Object getGroup(int groupPosition)
        {
            return groupPosition;
        }

        @Override
        public int getGroupCount()
        {
           
            return 2;
        }

        @Override
        public long getGroupId(int groupPosition)
        {
           
            return groupPosition;
        }

        @Override
        public View getGroupView(int groupPosition, boolean isExpanded,
                View convertView, ViewGroup parent)
        {
            TextView tv = null;
            tv = new TextView(Home.this);
            tv.setText("GroupView "+groupPosition);           
            tv.setPadding(30, 0, 0, 0);
            return tv;
        }

        @Override
        public boolean hasStableIds()
        {
            return false;
        }

        @Override
        public boolean isChildSelectable(int groupPosition, int childPosition)
        {
           
            return true;
        }
    }


Set the Adapter to Expandable List View
explvList.setAdapter(new ExpLvAdapter());
Output: