Thursday, August 25, 2011

Converting Pixel To Dip

The below snippet converts pixel to dip(Device Independent Pixel) . We have to pass pixel value as an argument then it returns dip value for that.

public int getDip(int pixel)
{
        float scale = getBaseContext().getResources().getDisplayMetrics().density;
        return (int) (pixel * scale + 0.5f);
 }

Wednesday, August 24, 2011

Maps on Android

      This Tutorial helps to intigrate google maps to Application. Default android package did not provide google maps library. So we have to add exteranlly or it can be downloadable with android sdk it self.

Step 1: (If you already did this then ignore this step)
Adding Google Maps library to Android SDK :
In Eclipse : Window -> Android Sdk and AVD Manager
Then the following window will appear.
In that window Select Available Packages
Click On Third Party Add-ons. Then you will find a list like below.
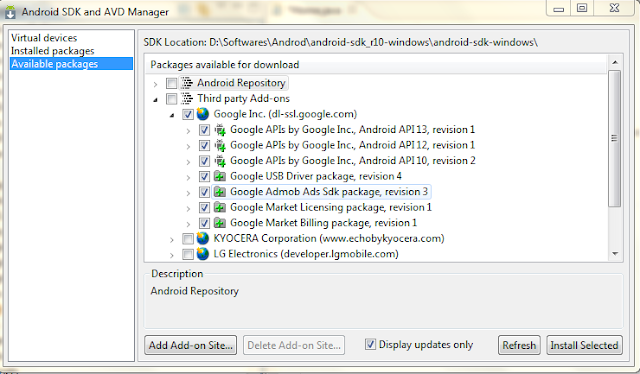
In that select Google Inc. In that select Google Api with the versions that you want and click on Install selected. Then It will install.
Step 2:
In order to display google maps in you app you have to genarate a MAPKEY .
Obtaining Map Key:
Generating MD5 FingerPrint for your system:
  • First we have to find default keystore existing in the system.
  • Go to C: ->  users -> Your User Name -> .android
  • There you find debug.keystore. Copy that keystore by creating a folder in c drive namely keystore.
  • Open Command Prompt and follow the image.


Then you get MD5 Finger print.

Registering Finger Print certificate with the Google Maps service:
Then you will get Map Key.

Step 3:
Adding Map Key to Application
If you want add maps in xml do like this

<com.google.android.maps.MapView
 android:layout_width="fill_parent"
 android:layout_height="fill_parent"
 android:enabled="true"
 android:clickable="true"
 android:apiKey="ApiKey"/>

Through coding then do like this
mMapView = new MapView(this, "ApiKey");

Step 4:
Change the Manifast.xml
<application
        android:icon="@drawable/icon"
        android:label="@string/app_name">
       < uses-library android:name="com.google.android.maps" />
      <activity
           .................
      </activity>
</application>

For detail information about google maps go to http://code.google.com/android/add-ons/google-apis/mapkey.html

Step 5:

Displying Google Map
manifast.xml:
<?xml version="1.0" encoding="utf-8"?>
<manifest
    xmlns:android="http://schemas.android.com/apk/res/android"
    package="com.googlmaps.activities"
    android:versionCode="1"
    android:versionName="1.0">

    <application
        android:icon="@drawable/icon"
        android:label="@string/app_name">
       
        <uses-library android:name="com.google.android.maps" />       
       
        <activity
            android:name=".Home"
            android:label="@string/app_name">
            <intent-filter>
                <action android:name="android.intent.action.MAIN"/>
                <category                        android:name="android.intent.category.LAUNCHER" />
            </intent-filter>
        </activity>
               
    </application>
    <uses-permission android:name="android.permission.INTERNET"></uses-permission>
</manifest>
main.xml:

<?xml version="1.0" encoding="utf-8"?>
<com.google.android.maps.MapView
    xmlns:android="http://schemas.android.com/apk/res/android"
    android:id="@+id/MapView"
    android:layout_width="fill_parent"
    android:layout_height="fill_parent"
    android:clickable="true"
    android:apiKey="0QpCkU-U_D--eTiGs8j5jCQ8LnJpyBgyoo7ilqQ"/>

Home.java:
package com.googlmaps.activities;
import android.os.Bundle;
import com.google.android.maps.MapActivity;
import com.google.android.maps.MapView;

public class Home extends MapActivity
{  
    private MapView mapView;
    @Override   
    public void onCreate(Bundle savedInstanceState)
    {
        super.onCreate(savedInstanceState);
        setContentView(R.layout.main);
       
        //Getting Id's
        mapView = (MapView)findViewById(R.id.MapView);
       
        //Getting Zoom Buttons
        mapView.setBuiltInZoomControls(true);
    }

    @Override
    protected boolean isRouteDisplayed()
    {
        return false;
    }
}

Output:
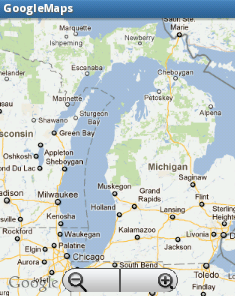
Step 6:
Adding Overlay Items
In order to add overlays on the map, create another class with the name as MapOverlays with the following options.
While creation mention super class as "com.google.android.maps.ItemizedOverlay"
MapOverlay.java:
package com.googlmaps.activities;
import java.util.ArrayList;
import android.content.Context;
import android.graphics.drawable.Drawable;
import com.google.android.maps.ItemizedOverlay;
import com.google.android.maps.OverlayItem;

@SuppressWarnings("rawtypes")
public class MapOverlays extends ItemizedOverlay
{
    private ArrayList<OverlayItem> mOverlays = new ArrayList<OverlayItem>();
   
    public MapOverlays(Drawable defaultMarker, Context context)
    {
        super(boundCenterBottom(defaultMarker));
    }

    @Override
    protected OverlayItem createItem(int arg0)
    {
        return mOverlays.get(arg0);
    }

    @Override
    public int size()
    {
        return mOverlays.size();
    }
   
    public void addOverlay(OverlayItem overlay)
    {
        mOverlays.add(overlay);
        populate();
    }
}

For the Home.java add these steps:

List<Overlay> mapOverlays;
Drawable drawable;
MapOverlays itemizedoverlay;
MapController mc;

//Creating Overlay Items
mapOverlays = mapView.getOverlays();
//Overlay marker
drawable = this.getResources().getDrawable(R.drawable.icon);
itemizedoverlay = new MapOverlays(drawable, Home.this);      

//Creation of Geo Point
GeoPoint point = new GeoPoint(19240000,-99120000);
OverlayItem overlayitem = new OverlayItem(point, "", "");
       
mc.setZoom(10);
mc.animateTo(point);
       
itemizedoverlay.addOverlay(overlayitem);
mapOverlays.add(itemizedoverlay);

Output:

Monday, August 22, 2011

Multiple Choice List Android

In Android List View provides an Option to allow Multiple selection of items. The following example shows the way to achieve this.
Example:


package com.lvcheck.activities;
import java.util.ArrayList;
import java.util.Collections;
import android.app.Activity;
import android.os.Bundle;
import android.view.View;
import android.view.View.OnClickListener;
import android.widget.AdapterView;
import android.widget.AdapterView.OnItemClickListener;
import android.widget.ArrayAdapter;
import android.widget.Button;
import android.widget.ListView;
import android.widget.Toast;

public class Home extends Activity
{
    private ListView lvCheckBox;
    private Button btnCheckAll, btnClearALl;
    private String[] arr = {"One", "Two", "Three", "Four", "Five", "Six"};
    ArrayList arrList;
       
     @Override
    public void onCreate(Bundle savedInstanceState)
    {
        super.onCreate(savedInstanceState);
        setContentView(R.layout.main);
       
        arrList = new ArrayList();
       
        btnCheckAll = (Button)findViewById(R.id.btnCheckAll);
        btnClearALl = (Button)findViewById(R.id.btnClearAll);
       
        lvCheckBox = (ListView)findViewById(R.id.lvCheckBox);
        lvCheckBox.setChoiceMode(ListView.CHOICE_MODE_MULTIPLE);
        lvCheckBox.setAdapter(new ArrayAdapter(this,
                android.R.layout.simple_list_item_multiple_choice, arr));
       
        lvCheckBox.setOnItemClickListener(new OnItemClickListener()
        {
            @Override
            public void onItemClick(AdapterView arg0, View arg1, int arg2, long arg3)
            {
                if(arrList.contains(arg2))
                {
                    arrList.remove((Integer)arg2);
                }
                else
                {
                    arrList.add(arg2);
                }
               
                Collections.sort(arrList);
                String strText = "";
               
                for(int i=0 ; i
arrList.size(); i++)                   
                       strText += arrList.get(i) + ",";
               
               
                Toast.makeText(Home.this, "Item Clicked: "+ strText, Toast.LENGTH_SHORT).show();               
            }
           
        });
       
        btnCheckAll.setOnClickListener(new OnClickListener()
        {           
            @Override
            public void onClick(View arg0)
            {
                arrList.clear();
                               

                for(int i=0 ; i < lvCheckBox.getAdapter().getCount(); i++)
                {
                    lvCheckBox.setItemChecked(i, true);
                    arrList.add(i);
                }
               
                String strText = "";
              
for(int i=0 ; i<arrList.size(); i++)   
                     strText += arrList.get(i) + ","
                Toast.makeText(Home.this, "Item Clicked: "+ strText, Toast.LENGTH_SHORT).show();
            }
        });
       
        btnClearALl.setOnClickListener(new OnClickListener()
        {           
            @Override
            public void onClick(View v)
            {
                arrList.clear();
                for(int i=0 ; i < lvCheckBox.getAdapter().getCount(); i++)
                {
                    lvCheckBox.setItemChecked(i, false);
                }
               
                String strText = "";
              for(int i=0 ; i<arrList.size(); i++)

                  strText += arrList.get(i) + ",";
               
                Toast.makeText(Home.this, "Item Clicked: "+ strText, Toast.LENGTH_SHORT).show();
            }
        });
    }    
}


Click Here To Download Complete Source

Tuesday, August 16, 2011

How To Move Applications to SDCARD in Android

From Android 2.2 Froyo onwards we can allow the application has to be installed on the external storage(SDCARD)

This feature is enabled by using this tag android:installLocation. By declaring this permission in the android manifast file.

If we do not declare this attribute, the application will be installed on the internal storage only and it cannot be moved to the external storage.

To allow the system to install your application on the external storage, modify the manifest file to include the android:installLocation attribute in the <manifest> element, with a value of either "preferExternal" or "auto". For example:

<manifest xmlns:android="http://schemas.android.com/apk/res/android"
    android:installLocation="preferExternal" or android:installLocation="auto"
    ... >


preferExternal : The App installs on the sdcard.

auto : There is no preference. The system will decide where to install based on several Factors.

However,  if your application is designed to support an API Level lower than 8, you can choose to support this feature for devices with API Level 8 or greater and still be compatible with devices using an API Level lower than 8.

To allow installation on external storage and remain compatible with versions lower than API Level 8:
  • Include the android:installLocation attribute with a value of "auto" or   "preferExternal" in the <manifest> element.
  • Leave your android:minSdkVersion attribute as is (something less than "8") and be certain that your application code uses only APIs compatible with that.
  • In order to compile your application, change your build target to API Level 8 (In default.properties). This is necessary because older Android libraries don't understand the android:installLocation attribute and will not compile your application when it's present.

Note: For More Information http://developer.android.com/guide/appendix/install-location.html

Wednesday, August 10, 2011

Youtube Preview Problem on android webview

Today i met with one problem. Actually i am getting the html data from the server. I am showing that using an webview. The problem is html data contain iframe tags. What it mean you tube videos. But at that position i am getting a black screen with you tube logo at bottom. But for iphone and Black berry directly loading preview.

      So that i tried to find the reason. I read no of forms. But there is no solution. On searching i found on e app with you tube videos. So Problem solved. They are taking the 1st frame of the you tube video and embed that using img tag and if we click on that image then redirect to the player.

      So i also search for getting 1st frame of an webview. The way is like this
                       http://img.youtube.com/vi/VIDEO_ID/#.jpg
Here VIDEO_ID : means every youtube vedio has one id.
                        #  :  0 - default size, 1- fisrst frame thumbnail , 2- second frame thumbnail,  3.....

So what you have to do is in the place of iframe tag did this type modification. Then problem will solved.

For More Details : http://www.reelseo.com/youtube-thumbnail-image/